Name Tag Etiquette for Customer-Facing Teams: Placement, Professionalism, and Care
Why Name Tag Etiquette Matters in Customer-Facing Roles
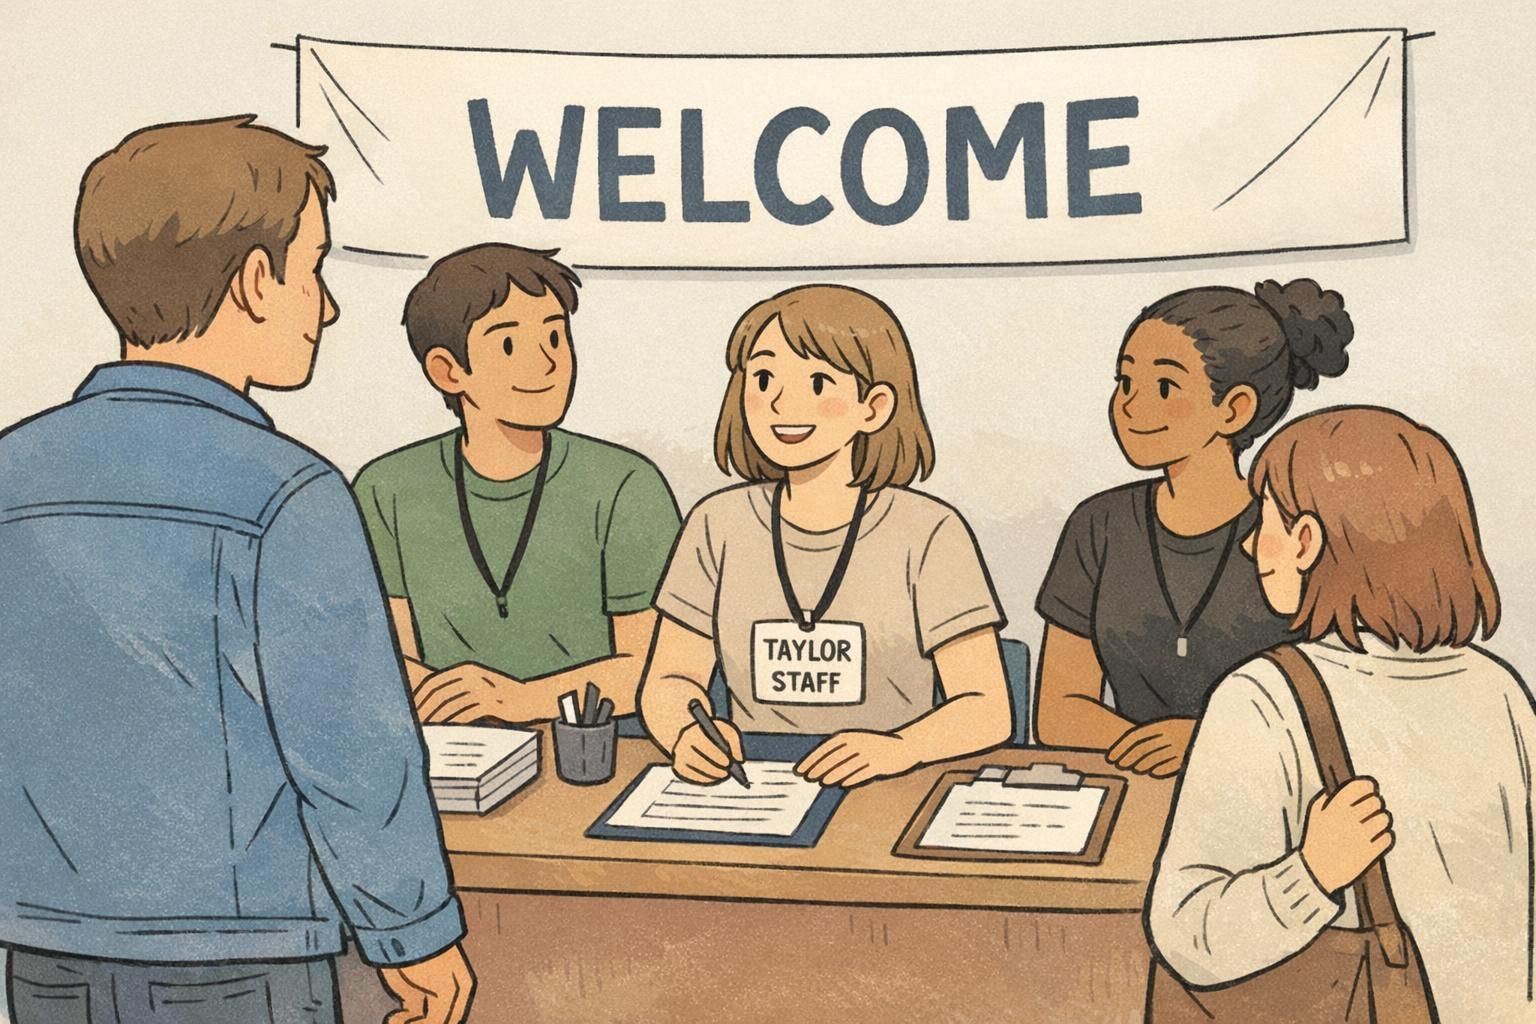
Good name tag etiquette makes customer interactions smoother from the very first moment. When customers can quickly see your name and role, they spend less time wondering who to approach—and more time getting the help they came for. That small clarity can lower tension during busy periods, especially when lines are long, shelves need restocking, and staff are moving between tasks.
A clear, readable badge also supports trust. Customers often feel more comfortable asking questions (or sharing an issue) when they can address a real person by name. It signals professionalism without requiring anyone to say, “Yes, I work here,” over and over.
The goal of name tag etiquette isn’t perfection—it’s consistency. A badge that’s visible, readable, and appropriate helps customers know who you are and what kind of help you can provide.
- Reduces confusion about who is on staff vs. another shopper
- Helps customers start conversations more naturally (“Hi, Alex…”)
- Supports a calmer experience during peak traffic
- Creates a consistent, professional first impression across the team
Where to Wear Your Badge (So Customers Can Read It Easily)
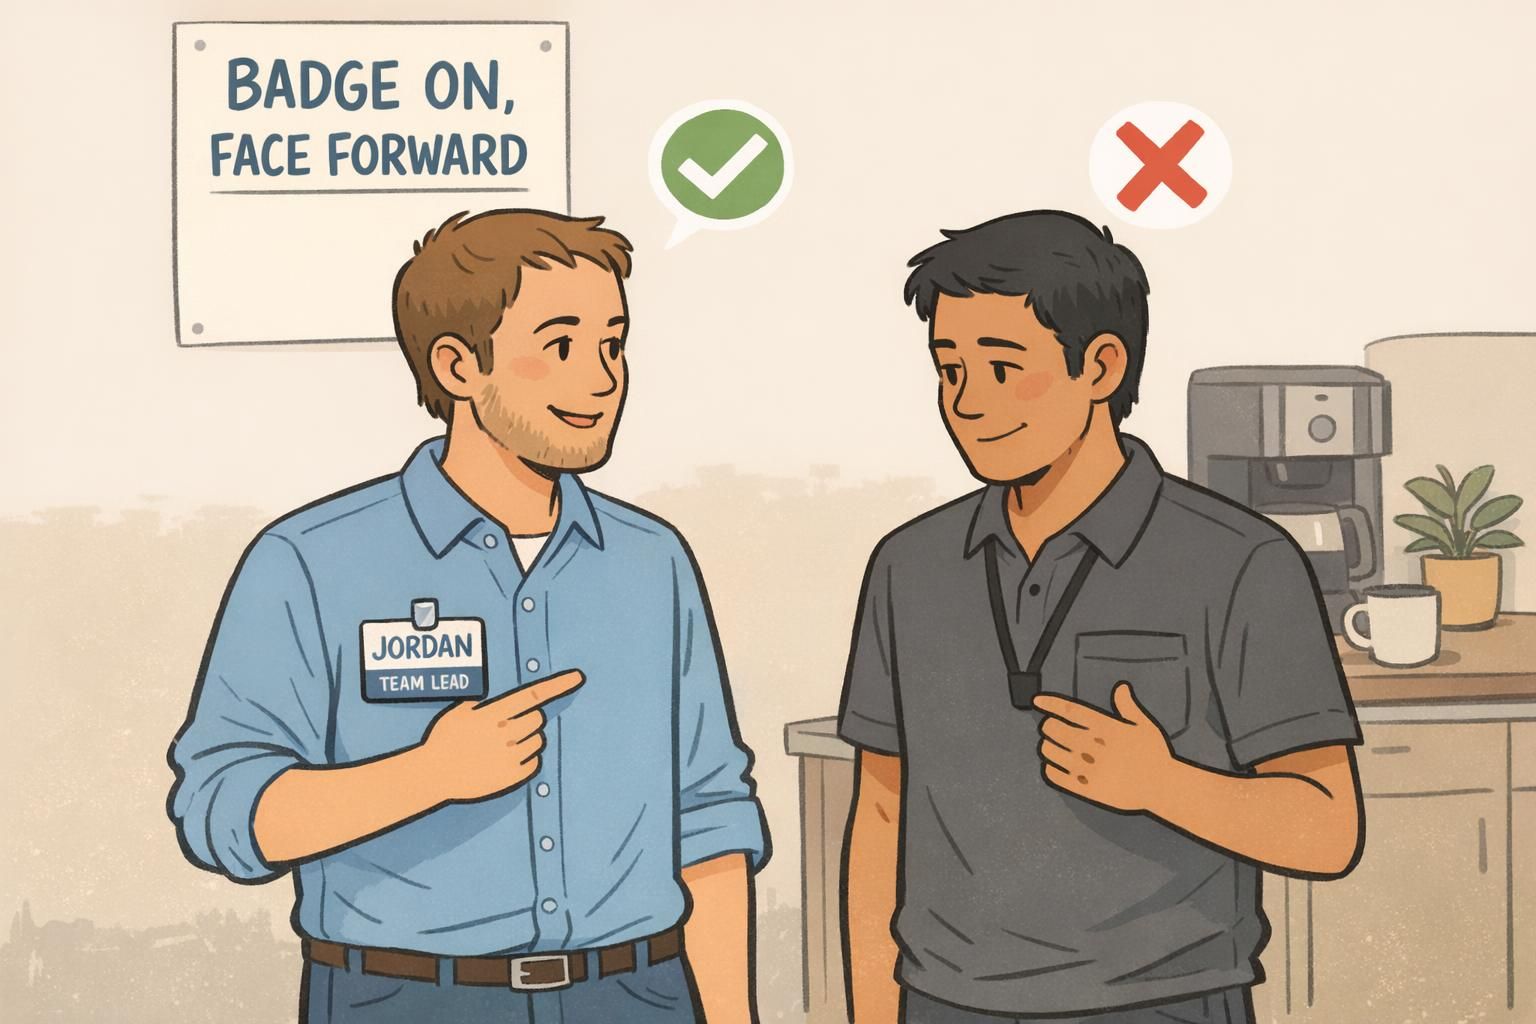
For most customer-facing roles, the best badge placement is simple: wear it on your upper chest, on the outermost layer of clothing, where it’s easy to spot from the customer’s perspective. This area is naturally in a customer’s line of sight during conversation, whether they’re standing at a counter or stopping you in an aisle.
Keep the badge front-facing and unobstructed. Hair, scarves, apron straps, jacket lapels, and radio cords can accidentally cover key details—especially your name. A practical rule is the “three-foot check”: if someone standing about three feet away can’t read your name without squinting, adjust the placement or consider a clearer format (larger print, higher contrast, or a different holder).
If your workplace uses lanyards, choose a length that keeps the badge stable and readable. Badges that hang too low often flip around, tuck into pockets, or get blocked by carts and boxes. When a badge swings, it becomes one more thing customers and coworkers have to wait for—especially when someone is trying to get your attention quickly.
- Aim for upper-chest placement on the outermost layer (shirt, vest, or jacket you’re wearing on the floor)
- Keep the badge facing forward—rotate clips or straighten lanyards as needed
- Avoid covering it with hair, scarves, aprons, or outerwear
- Do a quick three-foot readability check before stepping into customer areas
- If you use a lanyard, choose a length that sits mid-chest and doesn’t flip easily
What to Include (and What Not to Add) on a Customer Service Badge
A customer service badge should be easy to scan at a glance. Most customers are reading your badge while also thinking about their question, watching the line, or handling items. The more readable the badge, the less friction in the interaction.
In most settings, the most helpful information is: your first name (or first name + last initial) and a clear role label such as “Manager,” “Customer Support,” or “Floor Associate.” That combination helps customers choose who to approach and sets expectations for the kind of help you can offer.
What not to add matters just as much. Extra stickers, multiple pins, or tiny decorative elements can make the important parts harder to read. If your workplace allows personal flair, keep it minimal and away from the name and role so it doesn’t compete with legibility.
Also skip sensitive personal details. A badge is not the place for personal phone numbers, home addresses, or full employee ID numbers. If your organization supports preferred names or pronouns, those can be included in a way that stays secondary to the name and role—so customers can still find the essentials quickly.
A customer service badge works best when it answers two questions instantly: “What should I call you?” and “How can you help me?”
- Include: first name (or first name + last initial) in large, high-contrast text
- Include: a simple role label (for example, “Manager” or “Customer Support”)
- Avoid: clutter that competes with the name (multiple stickers, extra pins, tiny graphics)
- Avoid: sensitive personal details (personal phone numbers, home address, full employee ID numbers)
- If used: keep preferred names or pronouns clear but secondary to name and role

Retail Badge Policy Basics: Visibility, Consistency, and Exceptions
A clear retail badge policy makes etiquette easier because employees don’t have to guess. When the expectations are consistent, customers benefit too—they can recognize staff across departments, even when uniforms vary or seasonal layers come into play.
At a practical level, a policy should define who needs to wear a badge, where it must be worn, and when. Many workplaces keep it simple: badges are required any time staff are in customer-accessible areas, worn above the waist, and facing forward. That standard prevents the common issues—badges hidden by aprons, tucked behind jacket zippers, or hanging so low they disappear behind a cart handle.
Consistency in layout also matters. When the logo placement, name size, and role labels follow a shared pattern, customers can quickly confirm, “Yes, that person can help me,” without needing to scrutinize. Policies can also define acceptable add-ons (like an approved “Bilingual” indicator) and set a clear limit so the badge stays readable.
Finally, include a straightforward process for exceptions. Some employees may need adjustments for safety, privacy, or job-specific tasks. The best policies protect the customer experience while making space for legitimate needs—without leaving frontline staff to negotiate rules on the spot.
- Who: which roles must wear badges (and whether vendors/contractors need temporary badges)
- Where: above the waist, upper chest preferred, front-facing on the outermost layer
- When: any time staff are in customer-accessible areas
- Consistency: standard name size, role label style, and logo placement across departments
- Add-ons: define what’s allowed (and a limit) to preserve readability
- Exceptions: a simple approval path for safety or privacy needs
“When everyone wears badges the same way, customers stop guessing. They know who to approach, and our team spends less time redirecting people.” – Store Team Lead
Keeping Badges Clean, Undamaged, and Easy to Sanitize
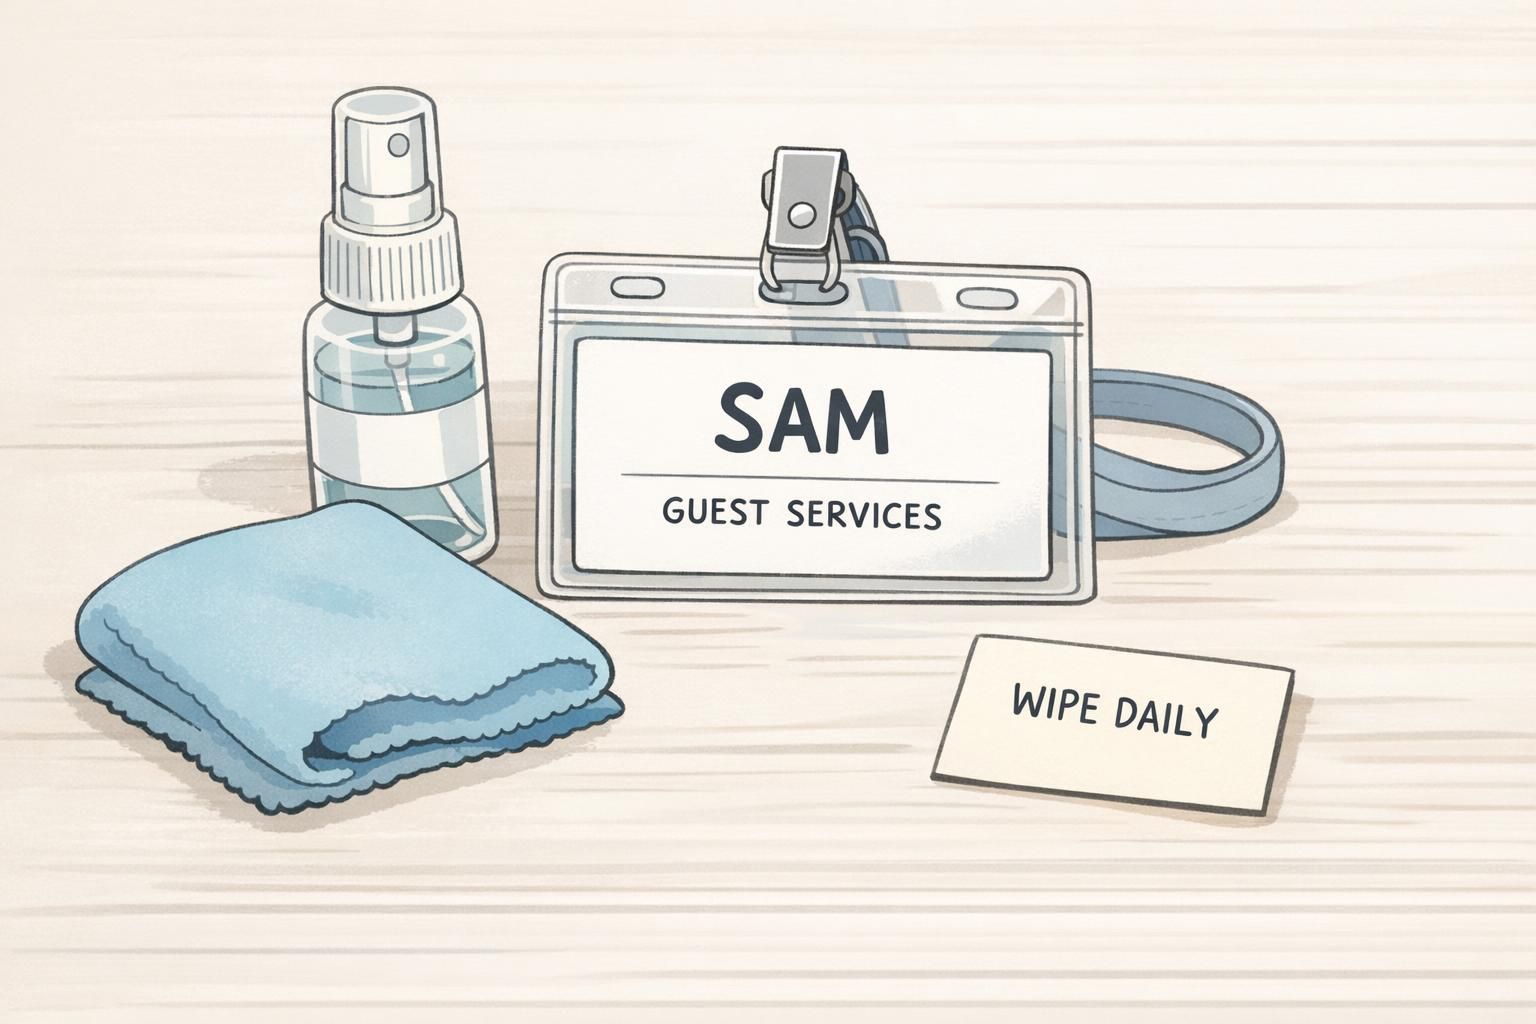
Badges get handled a lot—clipped on and off, adjusted during a shift, touched after handling products, and occasionally set on counters. Building a simple cleaning habit keeps badges looking professional and helps maintain a more hygienic environment, especially in workplaces with higher cleanliness expectations.
A good routine is to wipe badges as needed based on your environment and replace pieces that make the badge hard to read. Cracked holders, peeling labels, and faded print don’t just look worn—they reduce legibility, which leads to repeated “What’s your name?” moments that slow down service. For general best practices on cleaning frequently handled items in workplace environments, see this source.
Storage matters, too. Scratches and bends often come from tossing badges into bags or pockets with keys, tools, or pens. A consistent spot between shifts—like a locker hook, a small tray, or a designated drawer—helps badges last longer and stay readable.
If the badge looks worn or the text is fading, customers will feel the hesitation—even if they can’t explain why. Clean, intact badges support a confident, professional presence.
- Wipe the badge and holder as needed for your environment (and after visible soiling)
- Replace cracked holders, peeling labels, or faded print so names stay legible
- Avoid harsh abrasion that can cloud clear plastic and reduce readability
- Store badges in a consistent place between shifts to prevent scratches and bending
- Don’t toss badges into bags with keys, tools, or anything that can gouge the surface
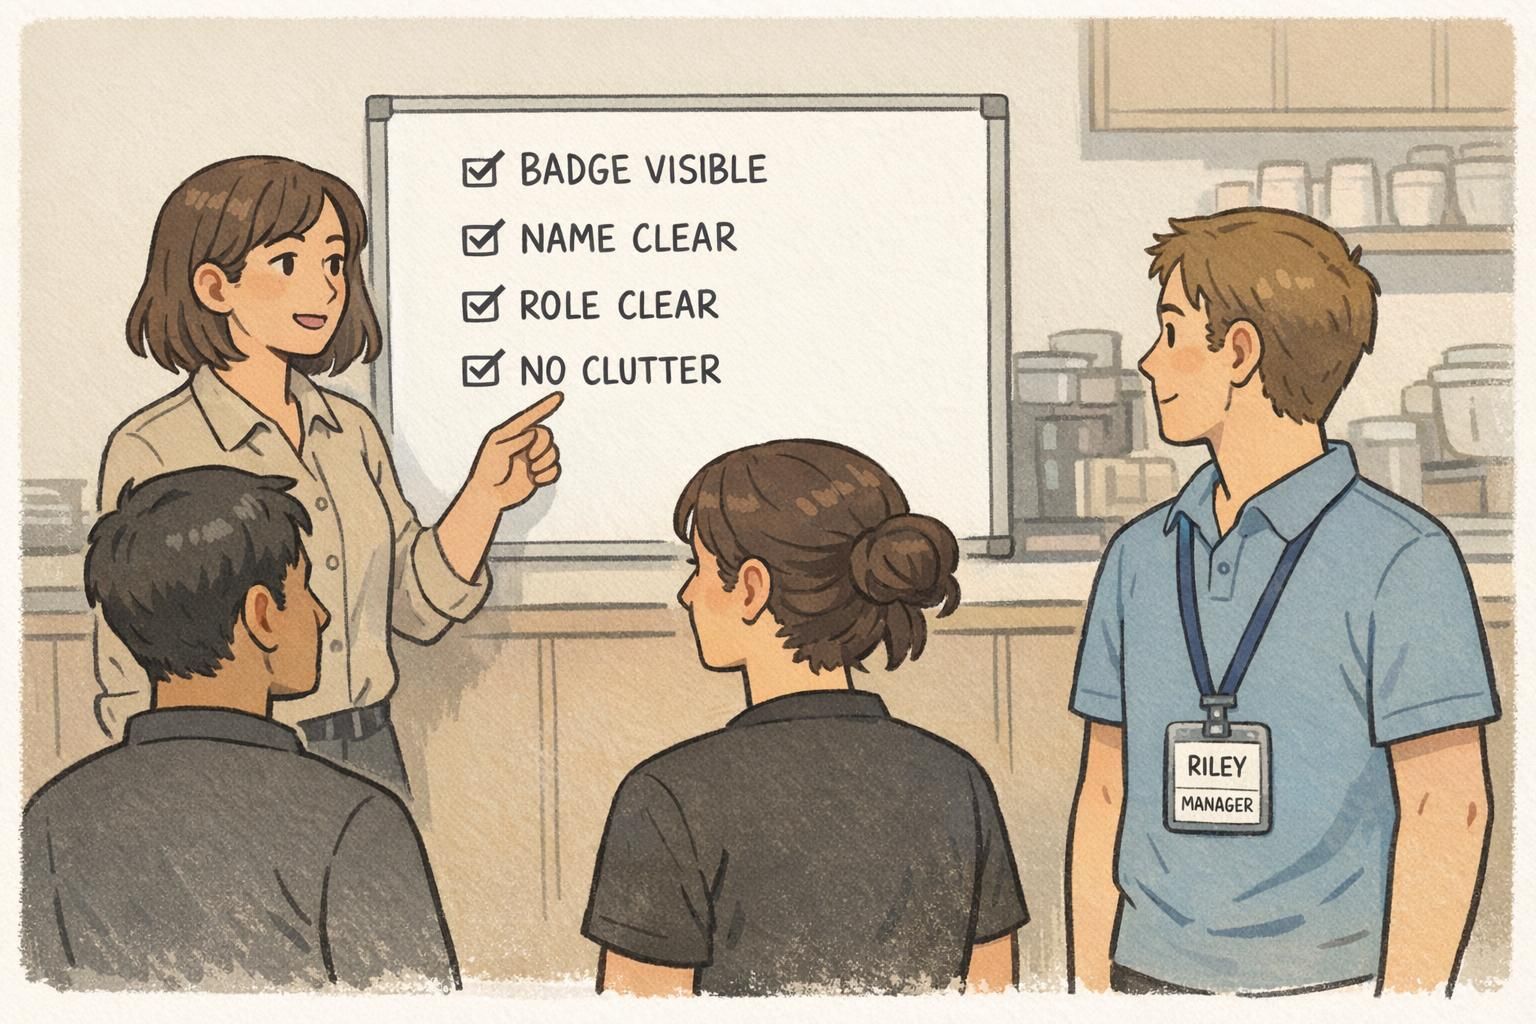
Quick Training Checklist + The Right Badge Format for Your Team
The easiest way to make badge habits stick is to turn them into a quick pre-shift check. When the expectation is the same every day—badge on, visible, readable—your team spends less time adjusting on the floor and more time helping customers.
It also helps to standardize badge formats by role so employees don’t improvise. For example, a front counter team may prefer magnetic name tags for a clean look and fast readability, while mobile staff may do better with durable vertical ID cards and secure clips that stay facing forward while stocking or moving between aisles. For events, pop-up locations, or seasonal hires, pre-printed event badges can keep things consistent while still being quick to distribute.
If you’re refreshing your team’s identification tools, consider using consistent layouts and easy-to-read printing across roles. Many teams start with simple, professional custom name tags to support clear introductions and a consistent customer experience.
- Badge on before stepping onto the floor
- Upper chest placement on the outermost layer
- Facing forward and not flipped or tucked away
- Name is readable at about three feet away
- Role label is clear and not blocked
- No clutter that distracts from name and role
- Holder/clip/lanyard is in good condition (no cracks, no peeling, no clouded plastic)
Wearing a badge where customers can’t easily see it—too low on a lanyard, tucked into a pocket, or covered by an apron or jacket. If it’s not visible at a glance, it won’t help customers.
Many teams use a first name (or first name + last initial) to balance friendliness and privacy. Follow your workplace expectations, and avoid adding sensitive personal details that don’t support customer service.
Use a lanyard length that rests mid-chest, and make sure the attachment keeps the badge flat. If it frequently flips or tucks into pockets during work, a different attachment style or format may be a better fit.
They’re especially helpful for pop-ups, temporary teams, seasonal hires, and check-in environments where quick distribution and consistent identification matter. A simple name + role layout keeps interactions fast and friendly.